Creating a Setting Form
Now we’ve learnt how to create an admin page in the previous tutorial. Next, let’s create a form so that your users can store options. This is very simple as well.
Steps
- Include the library
- Extend the library class
- Define the setUp() method
- In the setUp method, define the form elements.
- Instantiate the extended class
- Retrieve the saved options
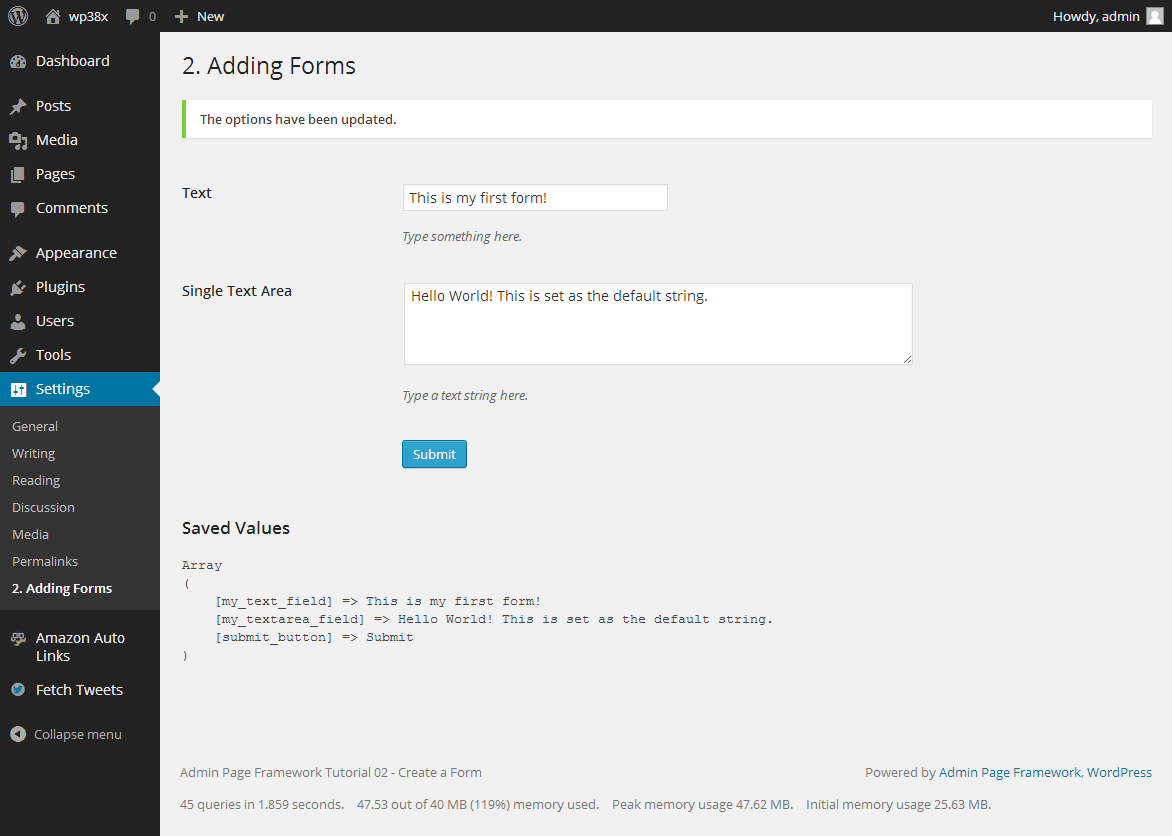
Screenshot

Include the library
The library file needs to be loaded.
|
12 |
include( dirname( __FILE__ ) . '/library/apf/admin-page-framework.php' ); |
Extend the library class
This time, let’s use APF_AddFields for the class name.
|
1 2 3 |
class APF_AddFields extends AdminPageFramework { // our code goes here… } |
Define the setUp() method
In the setUp() method, we define the admin pages to create. For that, we need to decide:
- the root page.
- the sub page title.
- the sub page slug.
We’ve covered this already in the previous tutorial.
|
22 23 24 25 26 27 28 29 30 31 32 33 34 35 36 |
public function setUp() { // Create the root menu - specifies to which parent menu to add. // the available built-in root menu labels: Dashboard, Posts, Media, Links, Pages, Comments, Appearance, Plugins, Users, Tools, Settings, Network Admin $this->setRootMenuPage( 'Settings' ); // Add the sub menus and the pages $this->addSubMenuItems( array( 'title' => '2. Adding Forms', // the page and menu title 'page_slug' => 'my_first_forms', // the page slug ) ); } |
Define the form elements
Now it’s time to decide what kind of form elements to create.
We are going to define the form in the load_{page slug} callback method which is triggered when the page starts loading. Although it is possible to define the form in the setUp() method, since the load_{…} callback method Is only triggered when the registered page loads, it saves some overhead compared to defining the form in the setUp() method which is triggered in all the admin pages.
|
1 2 3 4 5 |
public function load_my_first_forms( $oAdminPage ) { // Our code goes here. } |
To define the form, we need to tell the framework to create form fields by passing field definition array to the addSettingFields() method. Though there are required keys to remember for the field definition arrays.
Field Definition Arguments
- field_id – ( required, string ) the field ID. Avoid using non-alphabetic characters except underscore and numbers.
- type – ( required, string ) the type of the field. The supported types are listed below.
- and more. (for more details check out the documentation page for the addSettingFields().)
Okay, so let’s try creating very simple ones, a text input field, a text area field, and a submit button.
|
44 45 46 47 48 49 50 51 52 53 54 55 56 57 58 59 60 61 62 63 64 65 66 |
public function load_my_first_forms( $oAdminPage ) { $this->addSettingFields( array( // Single text field 'field_id' => 'my_text_field', 'type' => 'text', 'title' => 'Text', 'description' => 'Type something here.', ), array( // Text Area 'field_id' => 'my_textarea_field', 'type' => 'textarea', 'title' => 'Single Text Area', 'description' => 'Type a text string here.', 'default' => 'Hello World! This is set as the default string.', ), array( // Submit button 'field_id' => 'submit_button', 'type' => 'submit', ) ); } |
In the above code, there may be unfamiliar array arguments for you such as title, description, and default. The title argument will set the field title. The description argument sets the field description that will be placed below the input field. And the default argument sets the default value which is applied when no data is set by the user. There are lots of other keys that allow you to customize the fields. So check out the demo plugin and the documentation for more examples.
Instantiate the extended class
Finally, we instantiate the class. Unless it is instantiated, it will do nothing.
|
88 |
new APF_AddFields; |
Retrieve the saved options
So far the framework does everything for you, creating the page, the form, and saving the user input. But how do we get the stored user input?
For that, use the get_option() function as the framework stores the data as an serialized array into the options database table. What about the option key then? The framework by default uses the class name as the option key. So your code in this particular tutorial project will be $data = get_option( ‘APF_AddFields’ );. The $data variable will hold an array of options with the keys of form field IDs or section IDs depending on how you construct the form fields.
For example, if you need to retrieve the value of the field whose id is my_text_field, do something like, the following.
|
1 2 |
$data = get_option( ‘APF_AddFields’, array() ); $value = isset( $data['my_text_field'] ) ? $data['my_text_field'] : $data['my_text_field']; |
The option key to pass to the get_option() function can be changed with one of the parameters of the class constructor when you instantiate the class. For more details, check out the __construct() method of the manual.
Alternatively, you may use the AdminPageFramework::getOption() static method. This method reduces the necessity of calling the isset() method to check if an array key is set. The first parameter accepts the option key like the get_option() function. The second parameter takes the array key. The third parameter is for the default value when no value is set to the given key. So you use it like this.
|
77 78 |
echo '<pre>my_text_field: ' . AdminPageFramework::getOption( 'APF_AddFields', 'my_text_field', 'default text value' ) . '</pre>'; echo '<pre>my_textarea_field: ' . AdminPageFramework::getOption( 'APF_AddFields', 'my_textarea_field', 'default text value' ) . '</pre>'; |
Code
Try the code below and post comments if you get a problem.
|
1 2 3 4 5 6 7 8 9 10 11 12 13 14 15 16 17 18 19 20 21 22 23 24 25 26 27 28 29 30 31 32 33 34 35 36 37 38 39 40 41 42 43 44 45 46 47 48 49 50 51 52 53 54 55 56 57 58 59 60 61 62 63 64 65 66 67 68 69 70 71 72 73 74 75 76 77 78 79 80 81 82 83 84 85 86 87 88 |
<?php /* Plugin Name: Admin Page Framework Tutorial 02 - Create a Form Plugin URI: http://en.michaeluno.jp/admin-page-framework Description: Creates a form in an admin page with Admin Page Framework v3 Author: Michael Uno Author URI: http://michaeluno.jp Version: 1.0.2 Requirements: PHP 5.2.4 or above, WordPress 3.4 or above. Admin Page Framework 3.1.3 or above */ include( dirname( __FILE__ ) . '/library/apf/admin-page-framework.php' ); // Extend the class class APF_AddFields extends AdminPageFramework { /** * The set-up method which is triggered automatically with the 'wp_loaded' hook. * * Here we define the setup() method to set how many pages, page titles and icons etc. */ public function setUp() { // Create the root menu - specifies to which parent menu to add. // the available built-in root menu labels: Dashboard, Posts, Media, Links, Pages, Comments, Appearance, Plugins, Users, Tools, Settings, Network Admin $this->setRootMenuPage( 'Settings' ); // Add the sub menus and the pages $this->addSubMenuItems( array( 'title' => '2. Adding Forms', // the page and menu title 'page_slug' => 'my_first_forms', // the page slug ) ); } /** * One of the pre-defined methods which is triggered when the registered page loads. * * Here we add form fields. * @callback action load_{page slug} */ public function load_my_first_forms( $oAdminPage ) { $this->addSettingFields( array( // Single text field 'field_id' => 'my_text_field', 'type' => 'text', 'title' => 'Text', 'description' => 'Type something here.', ), array( // Text Area 'field_id' => 'my_textarea_field', 'type' => 'textarea', 'title' => 'Single Text Area', 'description' => 'Type a text string here.', 'default' => 'Hello World! This is set as the default string.', ), array( // Submit button 'field_id' => 'submit_button', 'type' => 'submit', ) ); } /** * One of the pre-defined methods which is triggered when the page contents is going to be rendered. * @callback action do_{page slug} */ public function do_my_first_forms() { // Show the saved option value. // The extended class name is used as the option key. This can be changed by passing a custom string to the constructor. echo '<h3>Saved Fields</h3>'; echo '<pre>my_text_field: ' . AdminPageFramework::getOption( 'APF_AddFields', 'my_text_field', 'default text value' ) . '</pre>'; echo '<pre>my_textarea_field: ' . AdminPageFramework::getOption( 'APF_AddFields', 'my_textarea_field', 'default text value' ) . '</pre>'; echo '<h3>Show all the options as an array</h3>'; echo $this->oDebug->get( AdminPageFramework::getOption( 'APF_AddFields' ) ); } } // Instantiate the class object. new APF_AddFields; |


Hi,
Outstanding work!!
I want to know if it is possible to save data to a custom table.
Thanks in advance.
Hi,
The framework does not have any methods to handle custom tables.
If you have to do it, you can do so in the validation callback method. The first parameter receives the user inputs. You can store them by using your own functions. In order to prevent the framework from saving user inputs in the options table, pass an empty string to the class constructor parameter that specifies the option key. Passing an empty key will tell the framework not to save data.
Then hook into
options_{instantiated class name}filter and in its callback method, retrieve your user’s data of the structure of an associative array and then return it back so that your custom table data will be reflected. The options data structure (associative array) should follow the structure of the framework. You want to check it in the validation callback and dump the user inputs.awesome content thanks for sharing
How do I display a form in the front end? ( on a page )
Hi,
Currently it is not possible. Sorry. You may add a feature request on the GitHub issue tracker. Thanks.Check out this issue.
Hi Michael,
thank you very much for this framework and tutorial, it has been very useful.
I’m created a form to save some custom theme settings, for example to save the categories which will be displayed in the homepage. How do I get the values saved in this form so to use them in a WP_query in my home template?
I’ll be very grateful if you could help me solve this.
Use the
get_option()function. The option key is the extended class name by default unless you set it in the class constructor. See how it retrieves the option values in this tutorial in thedo_my_first_forms()method. You can do the same thing in the front-end except using the class specific methods.